Sunday, June 01, 2008

VHF antenna (144Mhz), another one!

After building at least 4 different VHF and VHF/UHF antennas I found this design on the net and decided to build one to replace my trusty old one (little piece of TV antenna tubing and an support making an 1/4 wave vertical dipole).
The idea is to make an acceptable antenna at very low cost and weather/waterprof.


I started buying two plastic conduit tube of 3m each, so it will give me the opportunity to make two 1.5m antennas. Total cost was 2.5 Eur ( 1.25 Eur each antenna )


The aluminum foil I had in the kitchen and the electric tape and cable was in the spares box. So total cost by antenna could be around 4.25 Eur (and you still stay with lots of aluminum foil). 1 Euro to the PL plug, 1 Euro to the electric tape, 1 Euro to the cable and 1.25 for the plastic tube.
The tubes were VD12 for the foil suport and VD32 for the outside protection.
Now on to the images, it's self explanatory.


The aluminum foi was trimmed at the end to get the least SWR ( almost), I didn't care about getting to low because I would have to cut a litle more on the elements and since the antenna it's gonna be used to receive around 120 Mhz it's nice to be a little bigger.


Be prepared to do some trimming on the elements, put a little bit bigger and then cut with and knife in increments of 5mm till you get the resonance you want, my top element is around 56cm and the lower element is 39 cm.

The top cap will be placed latter, probably will use some plastic bottle inverted.
The idea is not to have an high gain but an simple and cheap construction that can last long in the roof.

Thursday, May 22, 2008

100 W dummy load

Some time ago I needed an 100 w dummy load for of air transmitter testing (it's bad to put 100 w on an antenna and whistle ).
What beter use for 42, 2k1 (2100 ohm) resistors in parallel :)
The box was done with an paint container after some cleaning. Originaly the idea was to put engine oil inside for termal dissipation but if I don't transmit for more than an minute theres no overheating problem.
The resistors were placed in an PCB board all lined up and the other end conected by an wire mesh.
The photos show the final product.


Sunday, May 11, 2008

Dummy load for bench testing

Another use for the mints box!


Some time ago I made some dummy loads for testing transmiters on the bench. For full power transeiver testing I have another one of 100 W also homebrew.
The loads were made using some recycled boxes and carbon resistors for not adding inductance in the circuit.
The small one is for UHF and was made out of SMD resistors ( 2 of 25 Ohm in series ) the other just for VHF is made of 4 resistors of 200 Ohm in paralel. It has an 50 Ohm resistor near the load connected to an RCA plug so I can transmit on the dummy load and get some signal without afecting the testing circuit.


There not much to say about this litle peaces, just drill some holes, put the plugs and solder the resitors, but if you have any question...just don't ask :)

Saturday, May 10, 2008

Speaker box ( first sound)

Finished!

After some spray painting (not an great job, but hey, I'm not a painter!) it was just an mater of placing the drivers in the box and make the connections.


After inital tests with the FT-102 and FT-307 I think it just needs an litle bit of tuning, first will make biger holes in the box, the sound it's an litle on the treble side. I think it will sound also better if I close the back of the box. Anyhow the sound is bright and on an fast test on 40m with lot's of noise I could copy lot's of stations, the FT-102 helps a lot on this.
The two speaker on top are 5.1 speaker from an old stereo that are being used for the TM-D700 VHF/UHF.

Detailed costs:

speakers: 24 Eur (more or less)
Bolts: 3 Eur ( a litle bit less )
Plugs (jacks): 4 Eur

Paint (left overs)
Wood (left overs)
Tools to make the round holes: 12 Eur (will use on another projects).
Cable (left overs)
My time ( priceless )

So the total cost was the same that would cost only one small CB speaker .
There's no excuse for not building at least one speaker box for your ham station! Not to mention all your antennas... later on this subject!

Sunday, May 04, 2008

Speaker box


After two sucessfull loudspeaker box for my home stereo I decided to create one to my radios.
Bought three small speakers just like the one used on television sets, just because they have good sound for voice.
Had some small peaces of wood laying around and created an small box, I'm not an great carpenter by I think after some painting the box will be nice looking.
I could use only one speaker but the wook size was ok for three and I have more than 3 radios so I still will have to build another speaker box.
Why do I have the trouble to build this box, well, just because I can and I think speaker boxes are overpriced. Each of the speakers only cost less than 8 Eur and the box nothing. The sound quality is not that important on radio communications, antennas are more important. So you can have nice sound for half the price of an miserable brand speaker.
The prototype:

Still need to drill the holes for the speakers and do some painting. After conclusion will post the pictures and an audio report.
Here the other side around:

This box will be for the Yaesu FT-102, Sommerkamp FT-307 and Kenwood TS-50. For my VHF/UHF dual bander I used an pair of satelite speaker that come with and stereo system.

Thursday, February 07, 2008

1 Year later


After one year without doing nothing except cleaning some dust, i think I will get on with the construction.
Must review all the connections and align. The easy part (soldering) is done.
Meanwhile I bought an Yaesu FT-102 for restauration (I works but needs some relay cleaning).

Also in the process of building ans SWR/Antena switch/Transceiver switch/antenna tuner). Box is done only the antenna tuner needs to be done... lacking variable capacitors, probably will homebrew some.

Friday, December 08, 2006

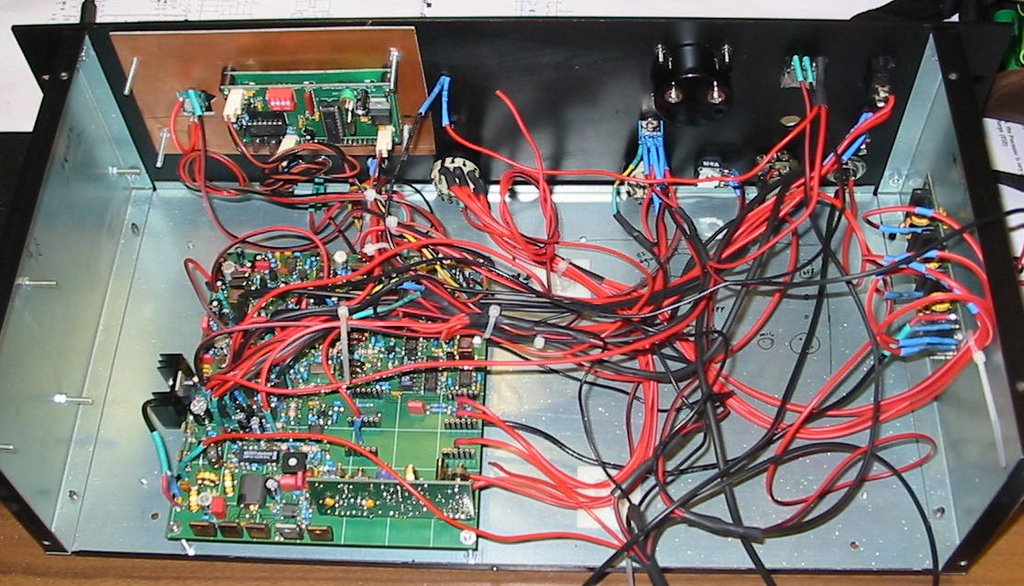
Cabling


Making the cabling inside the box is more demanding than soldering the kit. It'a an time consuming task.
I allready powered it up but can't change frequency on the display so I hope it's just some cables that are not connected yet. Programed the frequency counter but have to review again the instrutions. Power led lights up so the RIT led :). Got the volume working today.