Showing posts with label Trevo - Transceiver. Show all posts

Sunday, October 04, 2015

More filters

Some time ago I bought 3 isolated filters, one LSB, one USB and the other for AM, the idea is to use them as secondary filter for the "Trevo"....or maybe for some other project.

This time I bought another set, including the board where they all seen to come from. It looks some sort or IF part of a radio, it has the MC1350, MC1496 for SSB/mixing/amplifying. Just can't find any reference about the board.

Anyhow, the idea is to remove the filters the IC's and parts for other projects.

It's cheaper to buy the 3 filters than a single one from a major brand, if they are good or not, that's another story.

Have a nice week!

ps: Updated here with more info

Monday, July 20, 2015

Trevo bandpass filter - I

Slowly I'm getting the "Trevo" transceiver built.

I'm trying to get now the bandpass filter to some usefull state.

Here's the progress with the inclusion of relays for switching.

...decision that I already regretted after soldering all those small relays, each one is an inverter, so it takes two for each band, and I'm also grouping two separate sets (one for the low bands, the other high bands)...and still missing almost all the coax from the filters to the relays!


General schematic is this one:


...adapted from the "Speaky" transceiver without the diode switching part.

The filter includes a tuning voltage that is applied to C21, kind of pre-select with varicaps, input is applied on L2(3,4), output goes on L3(3,4) or vice-versa if you care....


The varicaps are going to be changed to diferent type from the ones in the "Speaky" because they are made of un-obtanium so I expect to do some changes in the filter componentes values.
The baseline is the following:

I never testes this configuration for the 160m band so I might have to change design for that band. Will probably include also one option for VLF bandpass or a filter bypass.


Still a lot to be done.

Have a nice week!

Saturday, June 20, 2015

Arduino digital out, 4 to 16 decoder/demultiplexer

.. .Using an 74HCT4514 ...

Controlling the VFO for the "Trevo" transceiver from the Arduino poses a small problem, the Arduino doesn't have enough output lines to control all the bandpass filters so I had to come up with a solution. There are some I2C IC's that would expand the digital output pins and do the job but I think that's like killing flies with a cannon so I went to a more "old school" approach.

The 4514 series IC used here, in high speed version (HCT not realy needed), is a 4 to 16 decoder with input latches, the latches are not needed on this case since there will be no signal change from the command lines.

Basically you input a 4 bit (parallel) binary and you have 16 digital outputs according to the truth table here:


This is the assembly (LED's were place on the first 3 outputs to check that is working correctly)


And the control schematic from the Arduino:


Sample code to output high (1) on Q1 of the 74HCT4514, pin 9:

// start sample
// setting the pins on the Arduino
pinMode(13, OUTPUT); pinMode(12, OUTPUT); pinMode(11, OUTPUT); pinMode(10, OUTPUT);
// send the data "1000"
digitalWrite(13, 1); digitalWrite(12, 0); digitalWrite(11, 0); digitalWrite(10, 0);
 // end sample


...now I still have to code the rest so that a band change activates the correct output...

Have a nice weekend!

Saturday, April 18, 2015

Trevo VFO

Continuing the work on the "Trevo" transceiver.

I am now focused on the VFO and transceiver control

add: Here's a new iteraction of the software now with s-meter:


The previous release:


Here's the software/hardware status:

* Implemented:


Frequency change by rotary encoder
Frequency change by CAT
Mode change by push button
Mode change by CAT
If shift control
Power supply voltage metering

* To do:

Change BFO and VFO of the frequency generator
S meter measure
Bandpass filter relay control
Mode relay control
Change band
Save settings
Proportional encoder speed change

Here's a simple working:


Have a nice weekend!

Tuesday, March 31, 2015

Arduino day!


Altough not a big fan of the digital and microcontroller part of the electronics world, I tried a few projects.

Last Saturday (28 March) was Arduino day so decided to post here some of the projects built with this little and "powerful" board.

1. Most important project so far is the "Trevo" transceiver VFO and control:

...a work in progress. The pot is for IF shift control, waiting for some patience to program the rest of the code, right now I can control the frequency by CAT and by the rotary encoder under the red knob. In the end will use the big Yaesu one that I got this week.

2. Testing of temperature, pressure an humidity sensors for a weather station or similar, using a Nokia LCD:

...it's the only "true" Arduino board I have, on other projects I'm using clones


3. The "Park Air Electronics" airband receiver external PLL controller (finished):


....maybe more to come.

Have a nice week!

Monday, December 01, 2014

Silicon Labs Si5351A loaded output

I'm really considering this device (Si5351A) to be the VFO and BFO for my new transceiver (Trevo).


I implemented some code, on the Arduino, to change frequency depending on the position of a potentiometer since I'm waiting some rotary encoders to arrive.

While I don't proceed with more code, started to investigate the best way to interface the output to an ADE-1 mixer since I'm using them on the "Trevo".
 Saying that: connected the oscilloscope probe to one of the Si5353 outputs and started measuring:

Unload (or for that mather loaded with the scope probe) I got around +19dbm.... _if_ the voltage was applied on a 50 Ohm load (measured 2 V on the scope).... that looks promising...., let's try loaded... and it drops to the following values and matching load (a carbon resistor was used):

47 Ohm: 316 mV
100 Ohm: 700 mV
220 Ohm: 1V

That sayd then the output impedance is 220 Ohm, not even a calculator is needed...

The stated datasheet impedance, for the Si5351, is 85 Ohm, I might be doing something wrong or not taking in account something else... I might try again with the probe in 10x to raise the scope loaded impedance.

 Anyhow loaded with around 50 Ohm (47) that's still +3 dBm, enough for some more testing ...
 Test frequency was 19.100 Mhz,


Have a nice week!

Sunday, October 12, 2014

My Arduino thinks he is an Yaesu.... and now outputs some RF

Got, last Friday, two of these:


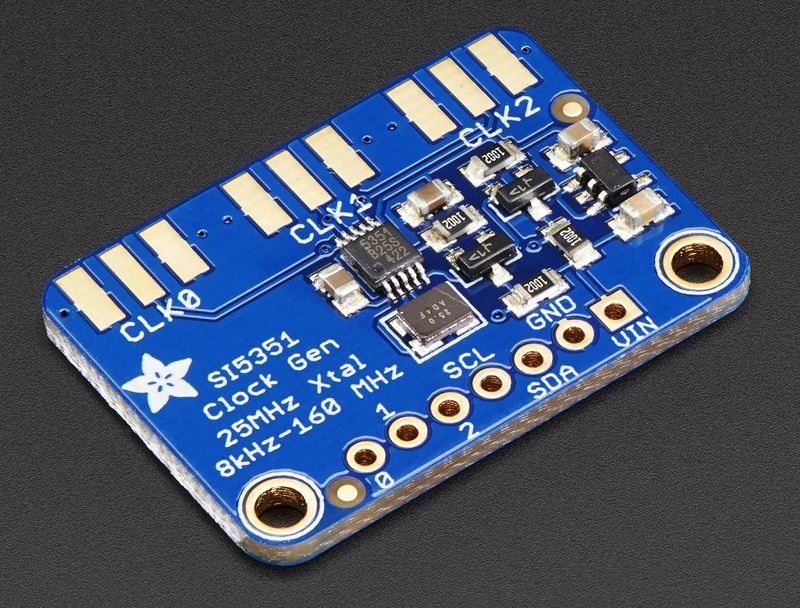
It's a breakout board with an Silicon Labs Si5351A that can output 3 diferent clock's.

And just in time after finishing the code for the computer controled VFO on the Arduino.

Plugged one of them to the Arduino and now have some RF using the supplied example on the library.

Now it's more coding so I can change the output from the Si5351 for the first mixer and product detector. Something tells me that it's not going to be easy...

I bough two of them since I am thinking in adding another IF to the "Trevo" transceiver and then create a "shift" and "width" controls by varying the BFO, VFO and the IF LO. I will try first to implement in software and them test, I'm sure gains on the different stages must be well defined. Anyhow will be easier in software than with cristal mixing schemes.

It must be two boards since the chip in fact only has two independent PLL's from what I've seen so far.

Have a great week!

Thursday, October 09, 2014

My Arduino think's he is an Yaesu (Arduino CAT controlled, VFO)


Here goes the basic code and details for the Arduino CAT controlled or Yaesu "emulator" for remote controlling a VFO from a PC.


I tested against "Rigresident" and "Commander v5.8.7" software using 9K6 on the serial port (Arduino USB serial console) and booth Yaesu 857 and 817 command set (are the same for all that matters).
The control of the VFO chip itself (Si570, AD9850 etc) is not implemented on the code, there are comments were it should be placed.  Consider the code as a base for your own solution.


If copy past of the following code does not work for you because of blogger formatting let me know, I can send code on email.

// Code starts here
//
// Basic code for remote control of an VFO base on the Arduino platform using CAT software or Hamlib
//
// Emulates basic functions of an FT857 (and similar Yaesu) in the Arduino platform from the perspective of the CAT software
// set mode, set frequence and get frequency only at the moment
//
// By: CT2GQV - Ricardo
//
// Licence: GPL - use according, in no way I will be responsable for the magic smoke you may get!
//
// Information sources: Hamlib, FT857.h from VE3BUX
//
// to be done: add s-meter reading and sending. Add code to control Si5351, Si570, ad9850/1 etc
// any help is apreciated

#include
#include
#include

// whatever lcd is used, might need some changes
// LCD control, SDA and SCL to analog 4 and 5 pin
#define I2C_ADDR    0x27  // I2C Address for my LCD, found with I2C scanner
#define BACKLIGHT_PIN     3
#define En_pin  2
#define Rw_pin  1
#define Rs_pin  0
#define D4_pin  4
#define D5_pin  5
#define D6_pin  6
#define D7_pin  7
LiquidCrystal_I2C       lcd(I2C_ADDR,En_pin,Rw_pin,Rs_pin,D4_pin,D5_pin,D6_pin,D7_pin);

// modes as going/coming from rig control, no need for hex since it will the last byte in the array, diferent story if it was the first....
#define LSB 0                          
#define USB 1                                        
#define CW 2                                           
#define AM 4                                             
#define FM 8
#define RTTY 10
#define PKT 12

// this could be done in a diferent way... see comments on the code about "to_bcd_be"
// ...don't remember coding so bad in the past years... oh well, get's the job done
#define HZERO 0x00                          
#define HONE 0x01                                        
#define HTWO 0x02                                           
#define HTHRE 0x03                                             
#define HFOUR 0x04
#define HFIVE 0x05
#define HSIX 0x06
#define HSEVEN 0x07 
#define HEIGHT 0x08
#define HNINE 0x09                                        
#define HTEN 0x10  
#define HTWENTY 0x20                                             
#define HTHIRTY 0x30
#define HFOURTY 0x40
#define HFIFTY 0x50
#define HSIXTY 0x60
#define HSEVENTY 0x70                                             
#define HEIGHTY 0x80
#define HNINETY 0x90

int incomingByte;   // for incoming serial data from rig control soft.
int counter_byte = 1; // just a counter for the bytes in radiocommand array
int radiocommand[5]; //  array to keep the previous commands from the rig control software...
int i; // just an aux counter
char a[8]; // will keep the hex to send to rig software when requests frequency vfo is in

// in the future get the next values (start up frequency and mode) from saved configuration...
//                 4 4 3,7 5 0.5 1 0 (this would be 443Mhz 750Khz and 513 Hz (show up as 443,750.51)
//                       8 5 0 5 1 3 ( 850 Khz and 512 Hz  (show up as  850.51)
int myfrequency[]={1,4,4,7,5,0,1,2,5};  // to rig control only first 8 values are sent...for vfo connected that a diferent story
int mymode = USB; // mode usb,lsb,cw,am,fm,rtty,pkt

// setup function of the Arduino
void setup() {
  
  Serial.begin(9600); // 9k6 speed, can be reduced.
  lcd.begin (20,4,LCD_5x8DOTS); lcd.setBacklightPin(BACKLIGHT_PIN,POSITIVE); lcd.setBacklight(HIGH); // 20x4 lines display LCD
  lcd.home(); lcd.print(" CAT controlled ");  // just dummy info, trying just to keep for 16 case lcd changes to 16x2
  lcd.setCursor(0,1);  
  switch (mymode) {case 0: lcd.print("LSB  "); break; case 1:  lcd.print("USB  "); break; case 2: lcd.print("CW   "); break; case 4: lcd.print("AM   "); break;
                   case 8: lcd.print("FM   "); break; case 10: lcd.print("RTTY "); break; case 12: lcd.print("PKT  "); break; }
  for (i = 0; i < 8; i = i + 1) { if (i==3 || i==6) {lcd.print(".");}; lcd.print(myfrequency[i]); } // print the startup frequency
////////////////////////////////////////
// put code here to initialize vfo connected to Arduino
///////////////////////////////////////
}

void loop() {

////////////// RIG CONTROL PART //////////////////////////////////////////////// 
 // do we have serial data?... 
 if (Serial.available() > 0) {
   incomingByte = Serial.read(); // read the incoming byte command from the serial line
   radiocommand[counter_byte]=incomingByte; // place the incoming byte on the array

  ////// let's start switching the commands sent from rig control software...
  
   // if the rig control software comand is 0x03 then send out current frquency by request of rig control software
   if (incomingByte==3 && radiocommand[4]==0 && radiocommand[3]==0 && radiocommand[2]==0 && radiocommand[1]==0 ) {
   // loop in myfrequency starting on the first vaule we have for frequency until the maximum of the myfrequency array (8)
   // if anyone has time to change the following this would be much better job with "to_bcd_be" from hamlib, basical convert to nibles and join and send...
   for (i = 0; i < 8; i = i + 2 ) { //loop all digits from 0 to 7 from the myfrequency array, join two by two and send the HEX value
       switch (myfrequency[i]) {
        case 0: a[i]= HZERO; break;  case 1: a[i]= HTEN;  break;  case 2: a[i]= HTWENTY; break; case 3: a[i]= HTHIRTY; break; 
        case 4: a[i]= HFOURTY;  break; case 5: a[i]= HFIFTY; break; case 6: a[i]= HSIXTY; break; case 7: a[i]= HSEVENTY;  break;
        case 8: a[i]= HEIGHTY; break; case 9: a[i]= HNINETY; break;   } // end switch first digit
       switch (myfrequency[i+1]) {
        case 0: a[i+1]= HZERO; break;  case 1: a[i+1]= HONE;  break; case 2: a[i+1]= HTWO; break; case 3: a[i+1]= HTHRE; break; 
        case 4: a[i+1]= HFOUR;  break;  case 5: a[i+1]= HFIVE; break; case 6: a[i+1]= HSIX; break; case 7: a[i+1]= HSEVEN;  break;
        case 8: a[i+1]= HEIGHT; break; case 9: a[i+1]= HNINE; break; } // end switch of the second digit
    } // end of the for loop to read frequency we are in and and convert to BCD
    // lets now send the frequency data to rig control software in this format a1a2.b1b2.c1c2.d1d2.ee (ee is mode)
    Serial.write(a[0]+a[1]); Serial.write(a[2]+a[3]); Serial.write(a[4]+a[5]); Serial.write(a[6]+a[7]); Serial.write(mymode); 
//////////////////////   
// no code is needed here because we are just sending the present frequency we are in
/////////////////////////////////////////////
   } // end send out current frequency
  
   // if the rig control software command is 0x01 then set frequency  whith the values sent aa.bb.cc.dd.0x01
   if (radiocommand[5]==1) {
         int tempo;           
         tempo = radiocommand[1]>>4; myfrequency[0]=tempo; tempo = radiocommand[1]&0x0f; myfrequency[1]=tempo;
         tempo = radiocommand[2]>>4; myfrequency[2]=tempo; tempo = radiocommand[2]&0x0f; myfrequency[3]=tempo;
         tempo = radiocommand[3]>>4; myfrequency[4]=tempo; tempo = radiocommand[3]&0x0f; myfrequency[5]=tempo;
         tempo = radiocommand[4]>>4; myfrequency[6]=tempo; tempo = radiocommand[4]&0x0f; myfrequency[7]=tempo;
         // print the new frequency we were requested to go to by rig control software
         lcd.setCursor(0,1);  
         switch (mymode) {case 0: lcd.print("LSB  "); break; case 1:  lcd.print("USB  "); break; case 2: lcd.print("CW   "); break; case 4: lcd.print("AM   "); break;
                   case 8: lcd.print("FM   "); break; case 10: lcd.print("RTTY "); break; case 12: lcd.print("PKT  "); break; }
         for (i = 0; i < 8; i = i + 1) { if (i==3 || i==6) {lcd.print(".");}; lcd.print(myfrequency[i]); }     
//////////////////////////////////
// put code here to set the new frequency on the vfo... ex: set_vfo(myfrequeny);
//////////////////////////////////
   } // end of rig control command to set a new frequency on the VFO
  
   // set mode command sent from rig control software
   if (incomingByte==7 && radiocommand[4]==0 && radiocommand[3]==0 && radiocommand[2]==0) { //rig control will set mode on the arduino
      if (radiocommand[1]==0){ mymode=LSB; }; if (radiocommand[1]==1){ mymode=USB;};
      if (radiocommand[1]==2){ mymode=CW;};  if (radiocommand[1]==8){ mymode=FM;};
      if (radiocommand[1]==4){ mymode=AM;}; if (radiocommand[1]==10){ mymode=RTTY;};
      if (radiocommand[1]==12){ mymode=PKT; };
      // will print mode on the lcd after mode change requested by rig control software..and also the frequency just to refresh the screen
      lcd.setCursor(0,1);  
      switch (mymode) {case 0: lcd.print("LSB  "); break; case 1:  lcd.print("USB  "); break; case 2: lcd.print("CW   "); break; case 4: lcd.print("AM   "); break;
                   case 8: lcd.print("FM   "); break; case 10: lcd.print("RTTY "); break; case 12:    lcd.print("PKT  "); break; }
      for (i = 0; i < 8; i = i + 1) { if (i==3 || i==6) {lcd.print(".");}; lcd.print(myfrequency[i]); } // print the startup frequency
//////////////////////////////////
// put code here to change mode ex; set_mode(mymode)
// if mymode = 1 (USB) then switch on digital pin 1...
// if mymode = 2 (CW) then switch on digital pin 2...
//////////////////////////////////
   } // end of set mode by rig control
///// end of pattern/command recognition part

  counter_byte++; // increment the position on the array read from the serial line        
  if (counter_byte>5) {counter_byte=1; }; // if we reached the end of the array.. that is previous counter byte = 5 and now 6 because we incremented before
 } // end of if serial avaiable cycle and command execution from RIG control software
///////////////// END / RIG CONTROL PART //////////////////////////////////////////////////

// put code on the next lines to read button/rotary press to change frequency, change mode etc..
// and other stuff....
/////////////////


} // end of main Arduino loop

// end of code


The LCD I used is this one (20x4  I2C connection):


I changed the code to use only 2 lines of the LCD since a 16x2 is more common than a 20x4.

LCD connection as follow:

GND from LCD to Arduino Pin Gnd (on power bus)
VCC from LCD to Arduino Pin 5v (on power bus)
SDA from LCD to Arduino Pin Analog A4 (on analog bus)
SCL from LCD to Arduino Pin Analog  A5 (on analog bus)

You can use a different LCD, just change the code.


Have a nice weekend!

Sunday, October 05, 2014

My Arduino think's he is an Yaesu

Having battling intermittently for the past two weeks to get an Arduino to "emulate" the Yaesu serial protocol I finaly got it, I can set frequency and mode from the rig control software on to the Arduino:

Setting the frequency:
 The Arduino picket up (My Freq:) and then I sent another frequency change to 446Mhz:


I didn't take the new frequency set picture (set freq) but it did worked. Mode "8" is the hex sent from the rig control software for FM mode.


Tried to find some other similar project and found none so have to make it myself, far as I know this is one of a kind! There are some projects but are to control an Yaesu radio from an Arduino, not the RIG CAT software to control the Arduino. The idea is remotely controlling the VFO of the "Trevo" transceiver (the one I've been building for the last year)
Will release the code if there's any interest and after beeing well polished... it will take time.

add: code: http://speakyssb.blogspot.ie/2014/10/my-arduino-thinks-he-is-yaesu-arduino.html

Have a good weekend!

Wednesday, June 11, 2014

QRG - Trevo

Yup, it's possible to build a complete radio using only an multimeter as test tool but to know the exact frequency it's more practical to use a frequency counter.

Got myself a frequency counter kit, it will help me "debug" the VFO:


Now i'm on the 80 and 20m band (9 +/- 5.212)

Have a nice day!

Thursday, June 05, 2014

The "Trevo" works

Ok, I don't know in what frequency it his receiving, only I got my first copy of Morse signals from the ether!

The reason I don't know the frequency is simple, the only test equipment used so far is a multimeter.
After trying to figure it out the frequency of the VFO (I was suspecting that I could be receiving in the 40M or 80M band) I fired the qrss transmitter kit and set it for 3.580 Mhz, after tuning the VFO got my own test transmission (I was receiving some amateur Morse before).

The VFO (lower right on the image) is not the final design, just a quick lashed up design without great stability. Tuning is made by a varicap and a trimer cap, the two blue trimmers are for fine an coarse frequency set.


The only problems so far were:

* Incorrect publication, on the original article, of a component value on the bias of the BFO oscillator transistor which I discovered quick; the measured voltage was two low for bias and had reception for a second or so (after power on) before loosing it (was testing the BFO/product detector at 4Mhz since there's powerful AM stations around, now the BFO is back on 9Mhz)

* Thermal shutdown of the LM7912 (I'm using it so in the future I can add a 2n3055 with collector to ground) occurred on the makeshift power supply after some time of power on, now with more modules have to set another design to power the transceiver.

* Incorrect bias of microphone on the connection to the balanced modulator (still have to find out how a elect mic element does not needs power to give signal)

Work to be done:

* Decide on the VFO design
* Finish the transmit section
* Finish the band pass and low pass filters
* Adjust everything

That should be more one or two years at this rate!

Have a nice weekend.

Tuesday, May 13, 2014

New transceiver - Trevo

No, it's not the latest from the "East", it's not the latest from the brand that makes cooking ware.... it's simple the "Trevo", a new transceiver I'm building.

It's made in Ireland, were the water is free, (not anymore), by a Portuguese using mostly schematics from the rest of the world.... it can't go wrong....

The idea will be to have a medium performance transceiver for the everyday use, using some classic blocks without big fancy stuff. I'm building in blocks that at anytime can be changesd or replaced, also trying to use common components without compromising too much the performance. Most of the signal switching is done using relays (I might regret this in the future).

So far I made the following parts/modules:

*The BFO oscillator on the left, on the midle the mixer (ADE-1) and on the right the audio pre-amp chain. Isolated below, and still in the making is the AM detector

 *The IF amplifier chain on top, below on the left, the IF filters, one AM one SSB one LSB and one USB at 9.00 Mhz. On the right the first RF pre-amp and the attenuator.

*Bellow the audio amp on the left and on the righ just a makshift power supply, on top left an experimental mixer.
* The bandpass filtering section

* The mic amplifier on the right (741), SSB and AM modulator (by unbalancing) midle and left (MC1496).


Regarding the schematics, when I'm happy with the performance I will post them...just wait.


Since all transceivers have names/model, decided to cal this one "Trevo"; it could be the acronimouns for "Transmiter Receiver Evolution".... no, it's the Portuguese word for Shamrock which is one of the symbols of Ireland. I hope it makes sense....


Have a nice week and good luck!