Last year got some small "calculator" bubble shaped 4 * 7 seg. led displays thinking it could be nice for a frequency display or some other stuff.
I was just missing the IC for serial connection/display driver since the Arduino has not enough pin's for the job.
The MAX7219 display driver arrived this week and without further I did the needed connections according to data sheet, sort of, it worked first time with only two switched segments, promptly corrected.
Each DIL display has set of 4 digits so bellow I'm using two set's.
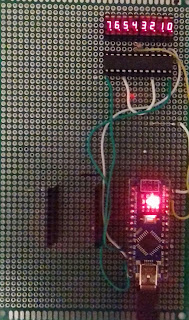
The outcome of the software/hardware combination:
The display connection/aka "rats nest":
Full picture with Arduino:
MAX7219 pin-out and connection example:
QDSP-6064 display pin-out:
Schematic:
The resistor for current limiting on the MAX IC (38K) was placed without any calculation only to be conservative. Setting the bright to "4" on the code (lc.setIntensity(0,4);) is more than enough for good readability.
Additional lecture:
MAX7219: http://tronixstuff.com/wp-content/uploads/2010/07/max7219.pdf
QDSP-6064: http://cdn.sparkfun.com/datasheets/Components/LED/BB_QDSP_DS.pdf
Arduino code for display testing:
///
// test code for bubble display HP QDSP-6064 and max7219
#include "LedControl.h"
#include "Wire.h"
#define PIN_DIN 12 // pin 1 on MAX72XX
#define PIN_CLK 11 // pin 13 on MAX72XX
#define PIN_LOAD 10 // pin 12 on MAX72XX
int di1=0; // first digit from Right to left is DIG0 on max7219
int di2=1;
int di3=2;
int di4=3;
int di5=4;
int di6=5;
int di7=6;
int di8=7; // left most digit is DIG7 on max7219
LedControl lc = LedControl(PIN_DIN, PIN_CLK, PIN_LOAD, 1);
void setup()
{
// MAX72XX is in power-saving mode on startup, we have to do a wakeup call;
lc.shutdown(0,false);
lc.setIntensity(0,4);
lc.clearDisplay(0);
lc.setDigit(0,di1,0,true); // if true then show the decimal point / DIG0
lc.setDigit(0,di2,1,true); // digit number 2 / "address" 1 / DIG1
lc.setDigit(0,di3,2,true);
lc.setDigit(0,di4,3,true);
lc.setDigit(0,di5,4,true);
lc.setDigit(0,di6,5,true);
lc.setDigit(0,di7,6,true);
lc.setDigit(0,di8,7,true);
}
void loop()
{
// do nothing here, the display was on during setup...
}
///
In the mean time I loaded code for a frequency counter. That will be part of another project.
Have a nice weekend!


